
SP-RO500 Countertop RO Manual

WARNING
When using this electrical appliance, always follow basic safety precautions to reduce the risk of fire, electrical shock, and/or bodily harm to persons or damage to the device, including the following:
- Read all instructions on the system and in the manual thoroughly before setting the device up for the first time.
- Only connect to a grounded outlet.
- Do not touch hot surfaces on the device.
- To protect against possible electric shock, fire, injury to persons, and/or system damage, do not immerse the device, its individual parts, cord, or plug in water or any other liquid.
- Closely monitor children around the device. Young children should not use the device themselves.
- Unplug the device during periods of extended disuse and before cleaning the device or changing the filter. Allow the device to cool before putting on or taking off parts and before cleaning.
- Do not plug in or attempt to operate the device if it is visibly cracked or damaged or if it has a damaged cord or plug. Contact the supplier immediately in such a case.
- For household/indoor use only.
- Do not use outdoors.
- Do not touch the plug or live part of the device with wet hands.
- Do not place on or nearby a hot stovetop or in a heated oven.
- Do not let the power cord dangle over the edge of a table or counter or come into contact with hot surfaces.
- To disconnect, remove the plug from the wall outlet. Pull the plug by the head, not by the cord, and do not yank the cord.
- Do not use the device for anything other than its intended use.
- Use extreme caution when dispensing hot water.
- Before inspecting or repairing the device, ensure that the appliance is powered off and unplugged.
- Do not use with water that is microbiologically unsafe or of unknown quality without adequate disinfection before or after the system.
Product Specifications
| Product Name | SpiroPure SP-RO500 Countertop RO |
| Rated Voltage | 110V, 60Hz |
| Power | 1600 Watts |
| Type of Protection Against Electric Shock | Class I |
| Water Tank Volume | 1 Gallon (4 Liters) |
| Product Dimensions | 11.7" D x 7.9" W x 15.75" H (297 x 200 x 400 mm) |
| Product Weight | 11.7 lbs (5.3 kg) |
| Temperature Range | 41-100°F (5-38°C) |
| Environmental Temperature | 39-104°F (4-40°C) |
| Inlet Water Source | Municipal Water |
| Filter Life | One Year or 530 Gallons (2,000 Liters) |
Note: The above data comes from laboratory standard testing conditions.
- The power value is tested under the following conditions: the inlet temperature is 68°F (20°C), after emptying the internal water storage tank (about 44 oz or 1.3 liters), the outlet temperature is selected at 203°F (95°C).
- Unit was tested under the following conditions: 77°F (25°C) with water containing 250 mg/L NaCl solution. When the inlet pressure and temperature fluctuate, the net water flow rate of the entire machine will fluctuate.
- The lifespan of the filter element is related to the water quality and water consumption in various regions.
Installation and Use
Step 1: Install the source water tank.
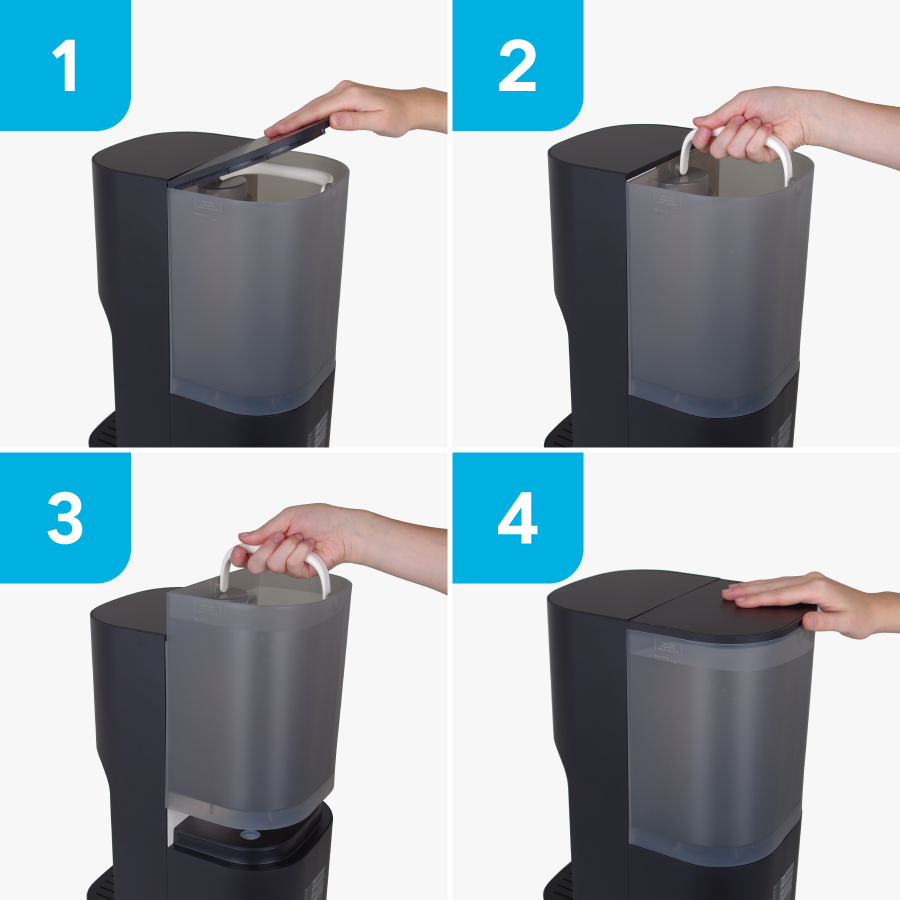
First, open the cover and lift out the source water tank. Fill the tank with tap water. Replace the source water tank and replace the cover, ensuring that it is properly seated. If the tank cover is not properly replaced, the machine will not function.
Wait 5 seconds after opening the cover of the source water tank before changing the water.
Attention: When changing the water in the source water tank, any remaining water must be discarded and should not be used again because the TDS value of this wastewater is high, and if left the TDS amount will begin to grow over time as the system filters more water and delivers more wastewater back into the source water tank.
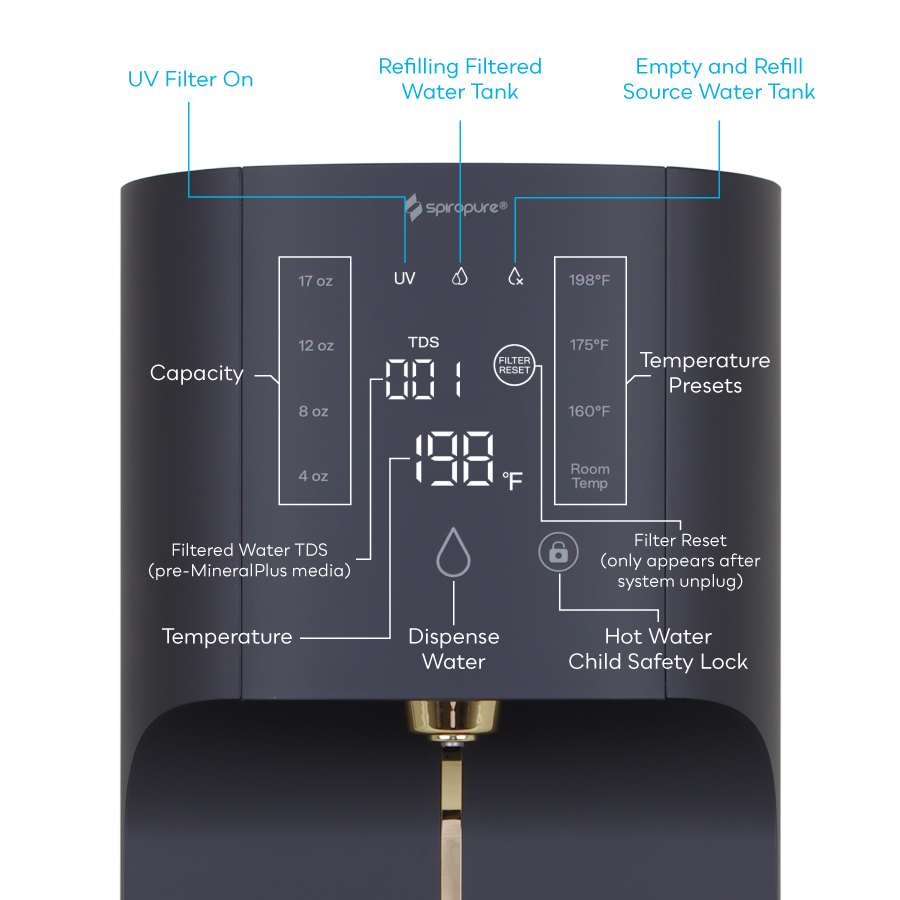
Touchscreen Menu
Step 2: Plug in the device and flush the filter.
Insert the power cord into an outlet and start up the device. Let it run through three tanks of water, emptying any remaining water and replacing it after each tank--this will be roughly 3 gallons (12 liters) and should take around 20 minutes.
Attention: The RO membrane contains moisturizing agents when leaving the factory. In order to fully flush the internal and connecting pipelines of the system and to ensure the performance of the RO membrane, please use the following pre-treatment methods after the initial installation or replacement of the filter element:
- Fill the source water tank
- The system will automatically begin filtering and storing the filtered water in the filtered water tank within the system. Once done, press the “Dispense Water” button. Keep dispensing until the “Empty and Refill Source Water Tank” indicator turns on. Discard the dispensed water.
- Fill the source water tank and discard the water three times to adequately flush the new filter element and system pipeline.
- After the flushing process, you can produce water normally. To ensure that the system is operating normally, first have the device produce a cup of room-temperature water, then have it produce a cup of 198°F (92°C) high-temperature water.
Step 3: Start producing filtered water.
Select your desired water temperature and water volume by touching the corresponding buttons. The device will display the selected water temperature and volume. Then to dispense the water, simply press the "Dispense Water" button.
Produce warm water for the first glass. Wait until the heating tube fills before dispensing hot water.
Note:
- During the water heating and filtering process, touch the "dispense" button again, and the machine will stop producing water.
- To obtain water at 160°F and 198°F (71°C and 92°C), first press the "Hot Water Child Safety Lock" button, and then press the "dispense" button. The machine will not produce water until the "Hot Water Child Safety Lock" button has been pressed.
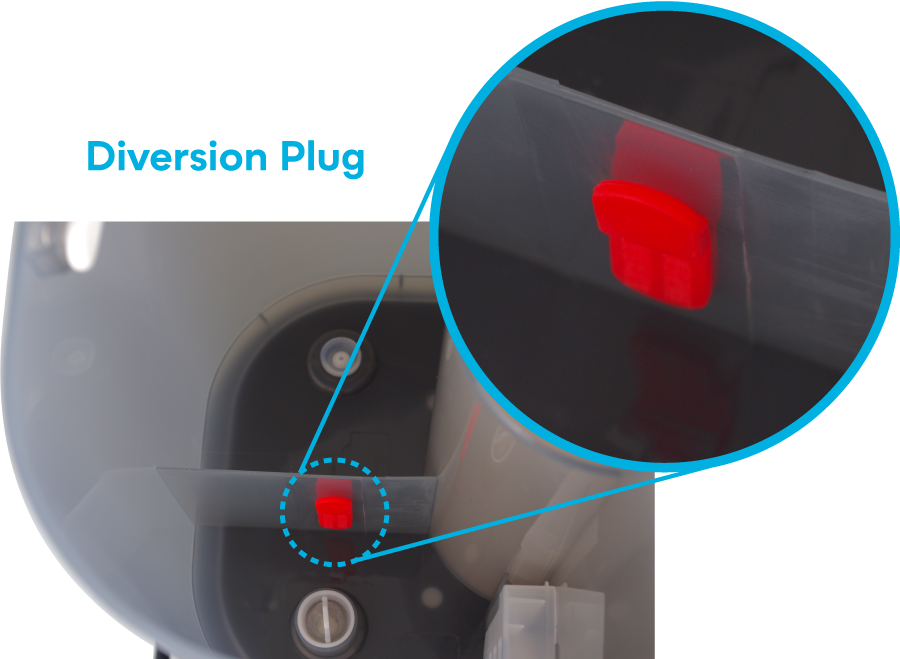
In areas with good water quality (TDS<500), remove the diversion plug in the middle of the source water tank. At this time, the source water tank can use 108 oz (3.2 liters) (the volume of the source water tank is 1 gallon (4 liters), which is more economical.
In areas with poor water quality (TDS>500), please keep the diversion plug in place. The source water tank can use approximately 95 oz (2.8 liters).
Drainage
When initially installing the device or if the device has not been used for more than 3 days, the system should be drained. Place a container under the spout and drain the device by holding the "12 oz" and "175°F" buttons for 5 seconds. The device will beep three times and initiate the system's draining function.
Change water
During use, when the "Empty and Refill Source Water Tank" indicator light on the display panel is on, it indicates that the source water tank is in a water shortage state or the water quality is poor and needs to be replaced. At this time, the water in the source water tank should be replaced, otherwise the machine will not function.
Safety Lock Mode
If there are no children using this product at home and there is no other risk of hot water scalding, then you can bypass the child safety setting. To do so, press and hold the "Hot Water Child Safety Lock" button for 10 seconds. To restore the child safety setting, press and hold the "Hot Water Child Safety Lock" button for 10 seconds again. Note: Cancelation of the child safety setting must be redone after power outages and restarts.
Warning: By cancelling the child safety lock mode, each time hot water is selected it will directly release hot water, posing a risk of burns.
Dormancy
When the machine is in an unused state for more than 1 minute, it enters sleep mode. Press any button and the machine will wake up and resume normal functionality.
Maintenance
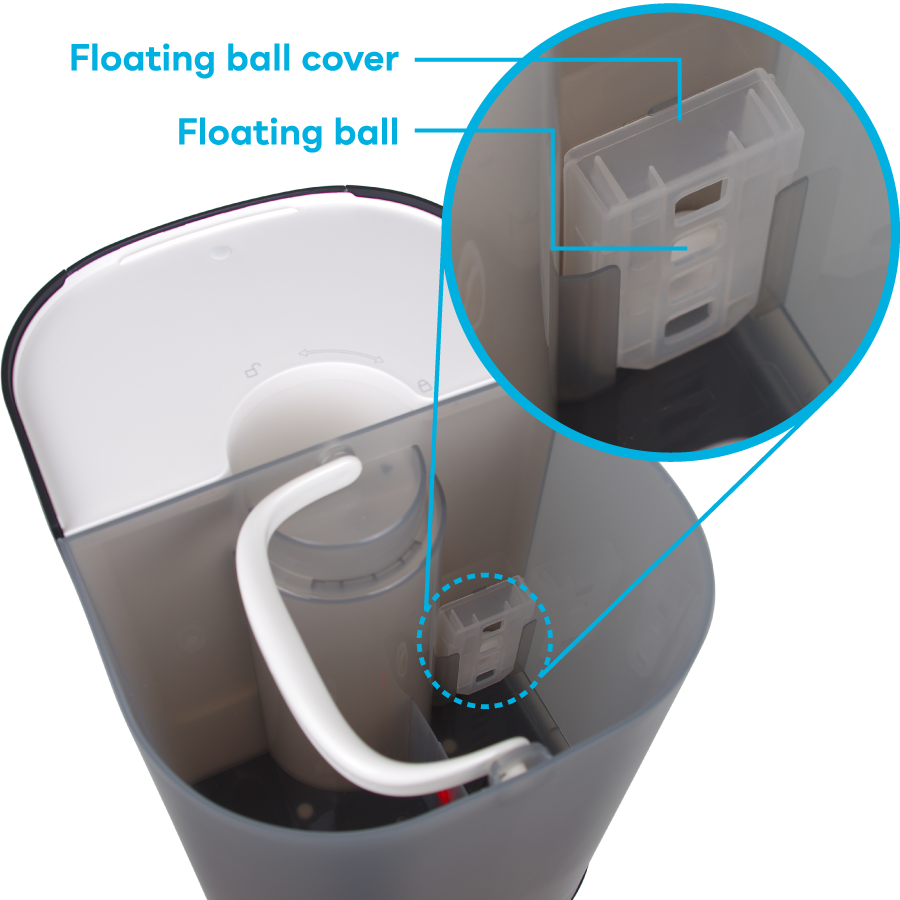
Follow the on-screen directions to replace the water in the source water tank in a timely manner. Do not use water stored in the source tank for over 48 hours. Please regularly clean the water tank using a soft sponge or rag with warm water and soap, and remove any sediment at the inlet and outlet of the water tank to avoid blocking and affecting the normal use of the machine. Regularly clean the tray as well. Please purchase and replace the filter element in a timely manner according to the device prompts. When the water level in the water tank is low, change out the water. Do not attempt to remove or manipulate the floating ball cover in the source water tank.
Filter Replacement
Please replace the filter element regularly according to the filter element reminder. Filter status prompts:
When the “Filter Reset” light remains on, it means the filter will expire approximately 2 weeks after the light first came on. Purchase a new filter as soon as possible.
When the “Filter Reset” light flashes, the filter life has expired. Please replace the filter element immediately and manually reset the filter using the following method:
Filter replacement and reset method:
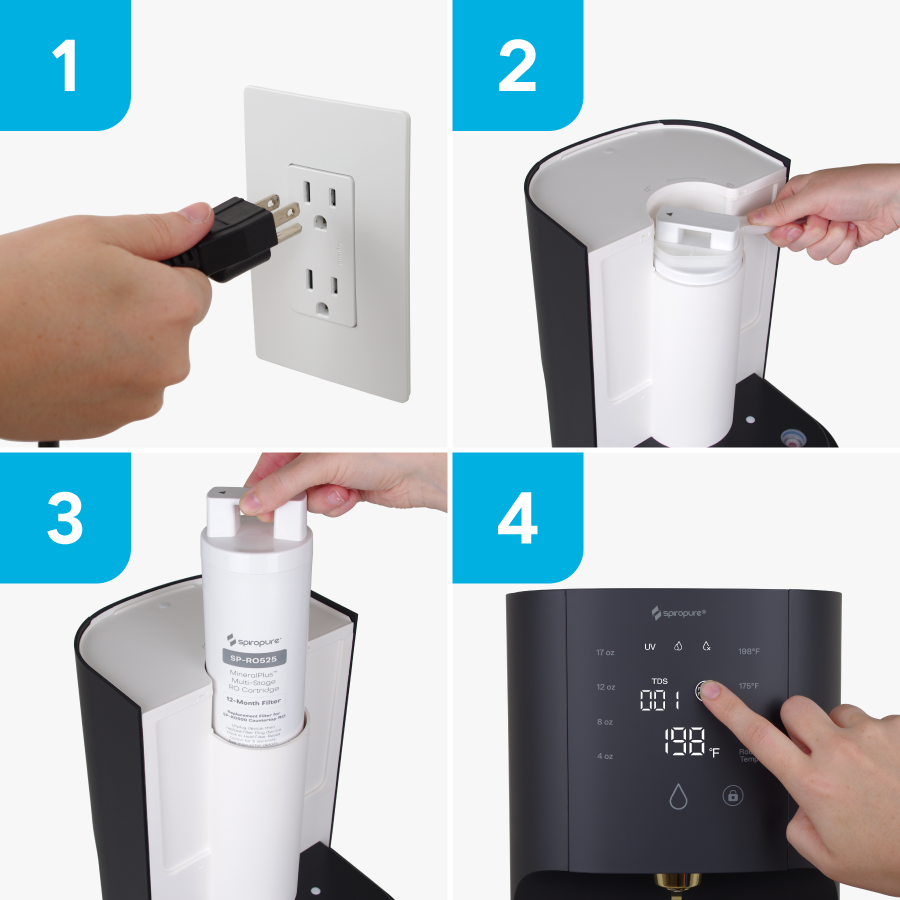
- When replacing the filter, first unplug the device.
- Open the cover of the source water tank.
- Remove the source water tank.
- Remove the top cover of the device. Rotate the filter counterclockwise 90 degrees to the "unlocked" position. Use the included wrench if the filter is too tight to remove by hand, then remove the old filter and discard. Note that replacement filters do not come with a wrench.
- Install the new filter element into the filter element compartment and turn the filter element 90 degrees clockwise to the locked position.
- Replace the source water tank and its cover.
- Plug the device back in. Press and hold the "Filter Reset" button for 5 seconds to reset the filter life. After resetting, the "Filter Reset" indicator light will no longer be on/flashing.
- After replacing the filter element, flush it the same way as when using the machine for the first time.
Troubleshooting and Common Solutions
| Status | Explanation | Treatment | ||||
|---|---|---|---|---|---|---|
| The machine has no display |
|
|
||||
| The water production light is on | The filtered water tank is being replenished with water | Wait a moment while the machine runs | ||||
| Water change light is on |
|
|
||||
| Filter reset orange light always on | Filter element warning | Replace and reset the filter | ||||
| Filter reset orange light flashing | Filter has expired | Replace and reset the filter | ||||
| The display shows EA error | The filter cartridge is out of place | Adjust the position of the cartridge or fully remove and reinsert it | ||||
| Machine does not produce water |
|
|